You know those someday maybe projects, that sit in a doom pile in the mind while waiting to finally be discarded or surge in importance? One of my projects was finally consolidating two blogging platforms into one. I had previously built a portfolio site with Gatsby way back in the day—like 7 years ago when I mainly focused on front-end engineering. It had a bunch of technical and human skills posts that had largely been dormant since 2021. However, the posts about TypeScript utility types still drive a lot of traffic to this day. I started writing again last year and wanted something that I could get up and running without having to worry about managing dependencies and fiddling with all of the little things. That was a quick way for me to get stuck in the minutiae, and not actually write. The content was also less technical, so I decided to separate it and spin up a Substack account.
Substack filled that need, but converting Markdown into their rich text editor was a pain. I also have increasingly prioritized owning my data and having that be in largely standard formats to increase the system portability. Substack fulfilled neither of those and also charges a premium for using a custom domain. My previous site was built with Contentful for data management. That was closer to raw text since I was running it through a Markdown converter during the build process, but still had some level of lock in.
With my recent unemployment, it was time to push this project to the surface for a consistent and updated presence on my domain. I only had to export 12 posts from Substack and 58 from Contentful. That should be straightforward right? 😂 After some research, I landed on using Hugo with a fairly minimalist theme. Importing the content from Substack was a largely manual process copying things from the UI, converting the rich text back to Markdown, and setting them up in Hugo. This also helped me learn some of the Hugo patterns and inform how I wanted to set up the directory structure and post frontmatter. Contentful was great that its CLI allowed a mass export of data and assets. It blessed me with a 16,281 line JSON file to somehow parse into a new syntax…
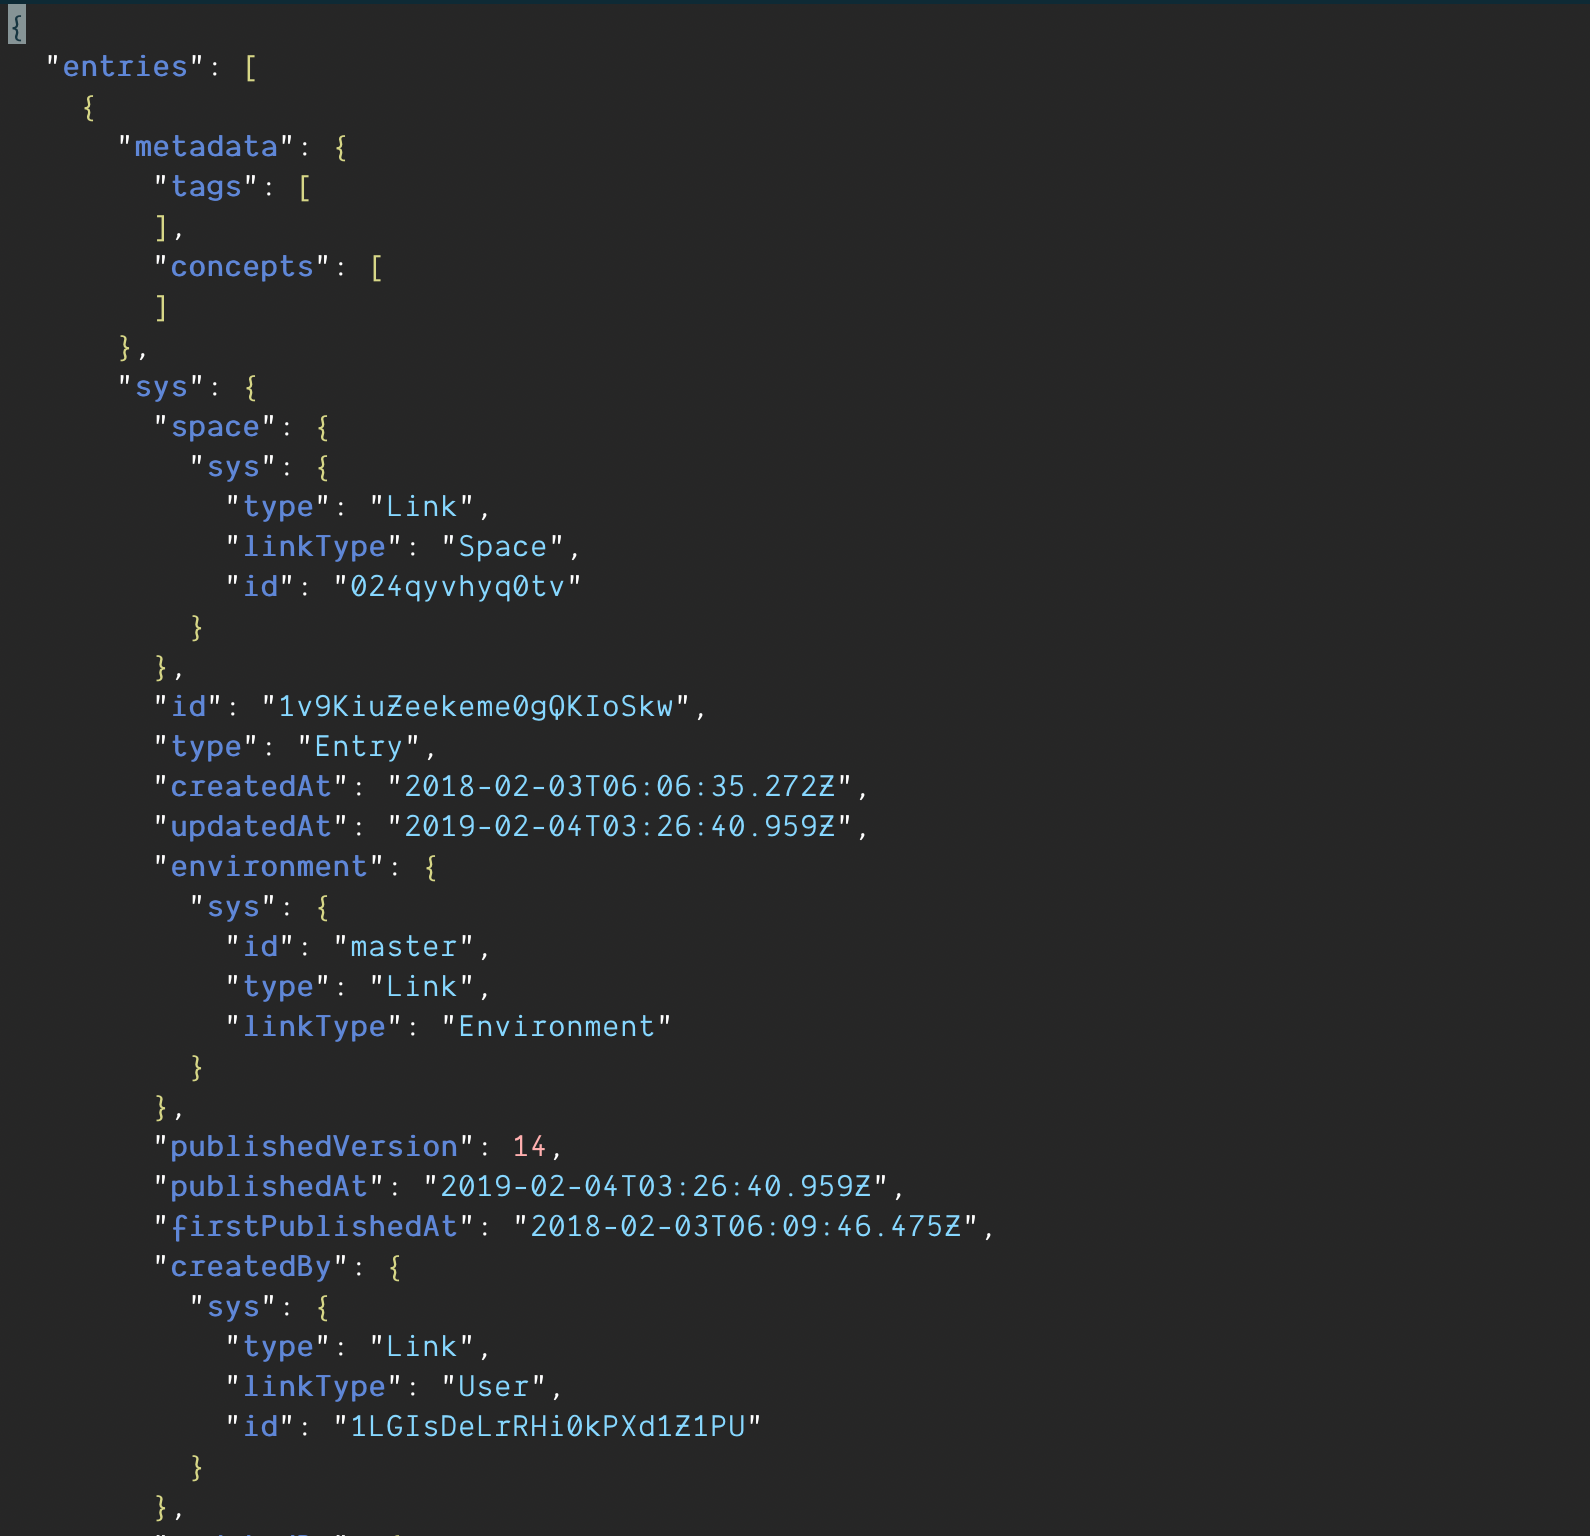
Having multi-lingual support and content modeling is great. It was definitely overkill when I built that site, but it was a great learning experience of how to utilize a CMS and integrate with the data model at the beginning of my career. There was no way I was going to manually copy this data over. Nor was I about to try and manually create a data scraping script. I’m sure I could, but I didn’t want to invest that energy. This felt like a good use of AI assistance to handle the tedium. Those who I’ve worked or talked about tech with know I have very nuanced thoughts around AI. I’m skeptical about it being a technical panacea, while also finding it really useful for refactoring and other tedious tasks. I’m finally diving into some of the ethics of it as I read Unmasking AI by Dr. Joy Buolamwini. I’m sure that will be a future post at some point. I decided to try a multiple prompt phased approach:
- Create a prompt to condense the massive JSON file into a normalized format with different lookup objects and arrays while discarding all of the Contentful specific data structures. Specifically I needed to normalize 4 content types: categories, tags, images, and posts.
- Create a prompt to use the normalized data to create Hugo posts with various branching logic. Some fields in a post were optional, and some posts would have multiple optional fields populated. I needed to make sure that they were assembled in the right order. I also have a different file structure for posts with images vs those without.
Tackling the Normalization Problem
There is only so much data that an AI model can hold in context. Importing too much data into the model quickly results in performance concerns and extra costs. I wanted to use Claude Code as a CLI tool for processing all of the data, while being able to process things quickly and cheaply. My first problem was to figure out how to write a prompt to extract this data. With some knowledge of the underlying data structure, I was able to identify:
- Where the respective content types were specified in the data structure.
- Which fields to pull off for each content type and which ones were nullable.
- Recognize that Contentful used asset pointers to reference other content models. If I wanted the posts to have populated categories, tags, and images I needed to populate their hash lookups first.
With that initial awareness, I set out writing the first pass of the prompt.
You are a data crawler which will normalize a large dataset into a normalized dataset for future use. All of the data you need is in ./export/contentful-export.json. You will write the normalized results to ./normalized.json. If a value cannot be found, set the value to null. This file will have the following structure:

{
  categories: {
    [id]: {
      value: fields.category.en-US,
      slug: fields.slug.en-US,
    }
  },
  tags: {
    [id]: {
      value: fields.tag.en-US,
      slug: fields.slug.en-US,
    }
  },
  images: {
    [id]: {
      name: fields.file.en-US.fileName,
      alt: field.description
    }
  },
  posts: [
    {
      title: fields.title.en-US,
      body: fields.body.en-US,
      publishDate: fields.postDate.en-US,
      headlineImage: fields.headlineImage.en-US.sys.id (replace with the name field from the images lookup for the id),
      keyQuote: fields.keyQuote.en-US,
      category: postCategory.en-US.sys.id, but use human readable value,
      tagIds: post.tags.en-US.sys.id (as array, but use human readable value)
    }
  ]
}

You will need to complete this task in a specific sequence.

1. Open export/contentful-export.json into your context.
2. Loop through the array of entries.
3. Look for records where contentType.sys.id is "tags" or "categories". Populate the corresponding object according to the pattern referenced above.
4. Look for records which have a fields.file.en-US.contentType which includes "image". Add them to the images record as indicated above.
5. Look for records where contentType.sys.id is "blogPost". Extract the data and add to the posts array as indicated above. Be sure to populate any reference to headlineImage, category, or tags using the previously stored lookup objects.
6. Finally, persist the final normalized output to the file referenced earlier.
I have never used an AI tool for data normalization before, so I wasn’t sure what to expect, but I also knew my initial approach was likely to have some failures and redirections as the model assembled the script. That turned out to be the case. After several attempts where the created script wasn’t working quite as expected or hit a case that I had not captured from my initial perusal of the data, it created a working 100 line python script to turn that 16,281 line raw data dump into 1,121 lines of normalized data.

JSON to a Usable Folder Structure and Files
Now that I had a much more usable dataset, it was time for phase two of making this into usable Markdown posts that Hugo could read and display. I took some lessons learned from the first prompt writing, copied the respective source files temporarily into my repository, and set off determining the requirements.
- I needed to loop through the posts one by one. I didn’t want to attempt doing them all at once only to find that I had some major issue in the process and had to start it all over. I was also tethering to my phone off and on while taking transit to and from my kiddo’s theater practice.
- I needed to have the title of the post slugified to determine the file name as well as some of the front matter.
- Determine if the post had any images in it, either as part of the body or with a previously used
headlineImageproperty. This determined which of mymakecommands to use. Posts without images would translate to a root level Markdown file, while posts with images would take advantage of Hugo’s post assets and nest the Markdown file and images within a directory. - Generate the file with the appropriate command, and move any images from a deeply nested Contentful folder structure to the corresponding location if applicable. My previous implementation also had hardcoded HTML entities and new line characters due to the previous rendering engine. Those would have to go as well.
- Finally populate the file and allow for validation.
Again I expected that this prompt would hopefully be about 80% of what I needed with some options to tweak it after a run or two. This prompt also had numerous sub-branches and steps depending on if certain variables were set. The initial prompt looked like:
Given a JSON file with a `posts` property, you will be creating Hugo posts. Initially, we will only do the process for one post. Do not proceed further without my approval. Once I approve the script works, you can continue with the rest of the posts. For each item in the array complete the following steps:

1. Take the post title and slugify it. Strip out any non-HTML safe characters and replace spaces with hyphens. Save this to a local variable called slug.
2. Determine if the post has any images in it. The conditions for this are if headlineImage is not null, or if there is a Markdown image link in the body value.
3. If the post has images in it, run the command `make name="$slug" new-post-images`. If it does not have images in it, run the command `make name="$slug" new-post-text`.
4. If the posts has images in it, find all of the corresponding image names. For each instance look for a file with the same filename within the subdirectories of ./tmp-images/. Copy that file to `./content/posts/$slug/images`.
5. The link portion of the Markdown image link should follow the pattern of `images/$fileNameWithExtension`. Update text as needed.
6. Now you can populate the Markdown file you created.
7. First we will do the frontmatter. This should do the following steps:
    a. Set `title` to the title of the post.
    b. Confirm that the `slug` is set to the variable determined earlier.
    c. Set `draft` to `false`.
    d. If the post has a category, set the `category` field to that value.
    e. If the post has a `tagIds` array with a length greater than zero, update the `tags` frontmatter to that value.
    f. Set the `publishDate` frontmatter field to the corresponding field in the data object.
8. Now we can start updating the Markdown body. For each main step that follows, ensure you are starting with a blank line at the bottom of the document. First we will handle `headlineImage` if it is set.
    a. Find the corresponding image in the `images` object. If it has an `alt` value that is not null, store that temporarily.
    b. Create a new Markdown link. Populate the [] portion with the alt value if available. Populate the () portion with the pattern of `images/$headlineImage`.
9. Now we can insert the `keyQuote` into the Markdown if the value is not null.
    a. The quote will be inserted using the Markdown blockquote syntax.
    b. If there are any HTML escaped bodies, replace them with the corresponding character.
    c. If there are any \n characters, replace them with proper line breaks.
10. Finally, we can handle the main body of the post using the `body` property in the dataset.
    a. If there are any HTML escaped bodies, replace them with the corresponding character.
    b. If there are any \n characters, replace them with proper line breaks.
    c. Insert the updated text into the Markdown file.
11. Now we can validate that the page is properly rendering with Hugo. To do this you will need to do the following:
    a. Run `curl http://localhost:1313/blog/$slug/`
    b. Confirm you get a response. Do a quick check that some of the text within the `body` parameter is in the returned result for verification.
    c. If verification has passed, you may continue. Otherwise, debug the issues before proceeding to the next post.
12. Congratulations. The post has been created and we can move onto the next one.
I set it off to run, and to my surprise there were only a couple of small snags which required some adjustments. As I worked through those issues, I would ask Claude to persist the updates back to the prompt file. I knew that this would be happening over several sessions. I quickly ran into an adjustment I needed to make with this in mind. How do I persist the latest index exported to reduce computation time since this wouldn’t be done all at once? Granted, this was a personal constraint due to working on the move, but I didn’t want to pay for it to traverse data that was already processed. I thought about having it delete the record in the source file at first, but didn’t want to do that until everything was completed. Yes I could have regenerated or copied the initial file, but destructive side effects always make the functional programmer in me squirm. I initially brute forced the issue by asking Claude to persist the last processed index in the prompt. Then I could pick up where I left off across sessions.
The process was working. I added in a manual verification test so I could check for any glaring issues. It still was a pretty slow process, but at least it wasn’t manual. After a few more runs, I knew there had to be a faster way to process things, though I didn’t know what to do. On a whim, I decided after a post had successfully been processed to simply ask, “This is taking a significant time per post. Can you suggest ways to optimize the workflow to reduce the amount of time per post and the number of tokens utilized?” It came back with about 6 suggestions, most of which I asked it to use. This included parallelizing some tasks, as well as refining how the data was loaded into memory using jq and storing the respective post and fields in memory. I ran through the process a few more times noting substantial improvements. A post could be processed in about a minute compared to the 2-3 minutes before. This included the manual verification and sometimes needing to stop and restart the server for the new images to be picked up, but it was still slow. I burnt through my initial $5 of credits on the final train ride home.
Final Optimization, Success, and Future Refinements
The most complex problems seem to get resolved with some time away from the keyboard. That often ends up being a nice walk, run, or bike ride in my case. Time in front of the keyboard is one thing, but the brain of a software engineer is always working in the background—at least mine is! As I cooked dinner, I knew there had to be more improvements to make still. I didn’t want to keep throwing money at the problem (even if it wasn’t that much) and wasting time waiting on the machine to do its thing. I had some ideas that I frantically jotted down on my phone for when I could tinker some more. I also had a bunch of ideas of future topics to write about since it appears my writer’s block has vanished.
I added some more credits to the account after dinner to avoid potential API usage getting out of hand and set off on the next round of improvements. I restarted the session, loaded in the latest version of the prompt, and again asked how to make this more performant and avoid it taking so long. Several more options were spit out on the screen. I again selected most of them. This time, the prompt had been refined enough, that Claude suggested it could create a Python script to handle the remaining 40 posts. The script combined all of the previous instructions and could handle a specific index of the array, or automatically increment the index. I decided to give it a try and see what happened. The corresponding Python script was roughly 500 lines, and I was asked if I wanted to do a test run of it within Claude. I did and everything worked perfectly. I was able to exit the session and handle the rest of the process directly on the machine, executing the script for each post one at a time without incurring additional costs.
The refined script took about a second per iteration. There were several times where it hit the curl step and said the page wasn’t rendered because Hugo had not recompiled yet. That’s pretty impressive considering that many of the recompile steps were sub 200ms. At this point the manual validation was me skimming through content, more than checking that the tool was working as expected. Before long, I had a fully populated archive of posts from 2 different sources now working in standardized Markdown format with Hugo.
 The brunt of the work was done. I learned a lot of how I could use AI tools for managing large datasets including the refinement of the performance of the actions throughout the process. I had spent about 15 hours at this point since first installing Hugo (and Go) for the first time and had all of the basics of a new blog platform. It was late Sunday evening, and I set up a list of tasks and clean up that I needed to do before deploying and switching over to the new website. Claude came in clutch with a number of them including:
- Updating some of the tag structure to eliminate a
#character that was no longer being slugified correctly and wasn’t important to remain. - Crawling through all of the old Gatsby post urls and creating 302 redirects to the new url format. I opted to eliminate the
YYYY/MM/DDportion of the slugs after some updated research and didn’t want to lose that hard earned SEO. - Update the casing of all the post tags for a consistent display
- Help debug issues with getting things deployed since I was using Git LFS for the images to improve repository performance.
So there we have it. In the course of 3 days and about 20 hours of work, I pulled blog post data from Contentful and Substack, spun up a brand new project with a static site generator I had never used before, and successfully had it hosted ready for the DNS changeover. There are still iterations to make on the site, but it is off to a tremendous start. If you are interested in checking out the code for it, you can find it over on GitHub. Yes it still needs a README, and some other things. 😆
If you like what you have read, and are hiring or know someone hiring a Senior or Staff backend focused engineer, please send them my way on LinkedIn. You can subscribe to the blog with the RSS link in the corner, or by accessing the feed directly. I’m hoping to port over the Newsletter functionality from my Substack in the not too distant future, but there is some more writing, job searching, and interviews on the priority list at the moment. Until next time, stay curious and ungovernable.